Sterling Silver Panels
More Videos at the bottom of the page.
http://www.moderustic.com/Sterling-Silver-Fireplaces.html
and
http://www.moderustic.com/Mike-and-Megan-Boling-Fireplace.html
several movies on this page at the bottom.
and
http://www.moderustic.com/Sterling-Silver-Panels.html
The panels come in 6 colors/ shades, Bronze, Gray, Black and each in reflective with chromium or sterling silver.
In most average fireplace s the panels are $125.00 each (up to 3 square feet) if a notch is required to clearance the gas line, add $55.00. Typical fireplace if you are doing all 3 panels is $500.00 or just the rear panel = $125.00
See Movies here:
http://www.Moderustic.com/Movies-Movies-Movies.html
6 Colors of Sterling Silver Panels!

Click "HERE" or on the picture above!
Click HERE or on the picture below to see how this was installed and what we used!

______________________________________________________________________
Ty Havas didn't want an ordinary Propane pan for his fireplace. He wanted a pan that would be more than functional. So after some sketches and discussions we began making a cardboard mock up.
He would ultimately receive a Stainless Steel pan with angled legs and a 2 inch depth. Here the cardboard mock-up along with his fireplace measurements (which you can see denoted on the cardboard piece below the mock-up) assure that we attain the correct size and appropriate design.
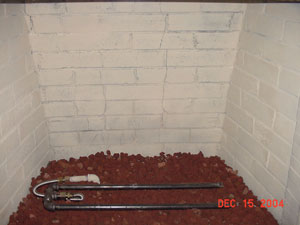
The fireplace is emptied out and it becomes apparent that its in dire need of a fresh coat of paint. And since the custom pan was built with legs, the fireplace floor will be left visible and as a result fresh tile will be added to the hearth.
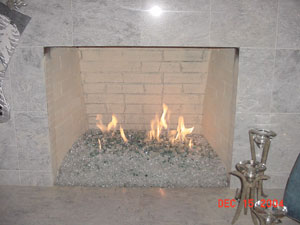
The fireplace re-design is complete with two custom reflective sterling silver panels on either side of the pan to give the illusion of the fireplace being larger.
The stainless steel pan is filled 1/4" Bronze Base Glass, 1/4" Bronze Reflective Base Glass, Copper Ruby Red topper, Yellowish Opal Orange Topper, and Red Brown Topper.
A wonderful transformation.

This fireplace belongs to Dr Bernstein, who got a whole lot of good stuff. Starting with a double 24" steel fireplace burner, and reflective Sterling Silver panels.
The Doctor filled her fireplace with several of our Unique FireBalls, and a mixture of two sands, Black Magic and Green Sand.
This series of pictures come to us from Mark Diefre who has a Palm Springs condo with two direct vent fireplaces who were suffering from ugly fake logs.
So he contacted us, like everyone who gets told they can't have a direct vent with FireGlass. Below you can see the unit as it was originally, with a low level fire.
Here is the same fireplace after our conversion, notice how much larger the fire is.
And even though Mark's fireplace looked a lot better, he still wasn't satisfied. So he got a Sterling Silver panel for the back wall.
A while later though we again heard from Mark, who decided he needed two more Sterling Silver panels; completing his Direct-Vent fireplace.
With the success of the downstairs fireplace, Mark decided on doing a his upstairs Direct-Vent fireplace in the same fashion.
Both fireplaces used Gray Base Glass and Gray Reflective Base Glass FireGlass.

The fireplaces we are about to show you are Sterling Silver Coated panels we have developed. No they are not just mirrors! (try it and let us know what happened). We are now working on a template procedure to send the customer to help us properly fit each panel. The first set of pictures are from David Barron in Southern California.
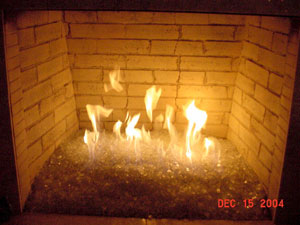
You can see the flames reflect off of the side and back walls from the
Sterling Silver coated panels. Well if you ever thought of doing this, we now can! We pride ourselves in being the first in creativity, design, innovation and customer service. Most of our ideas and creations will be copied, but many months later we are at that time are already on our 2nd or 3rd generation product line anyway. Imitation is the highest form of FLATTERY! Thank you, no really Thank you! Our drive is to satisfy the customer with creativity and ingenuity.
We will be posting more pictures when they are available. Please send your thoughts on our ideas and product developments, we really do appreciate your thoughts.
Ed
Ed@Moderustic.comThe fireplace below is from Cory here locally in Rancho Cucamonga California. This transformation was a complete surface make over along with out Sterling Silver interior. The glass that was used was
Bronze Base Glass. This is truly a DIY project and we like to help you create your ideas to reality.
Here we begin with the old interior brick panels removed.
Below you can see the new stone being applied.
Now you can see the reflection on the walls in the Sterling Silver panels. No, these are not just mirrors in the fireplace. If you do try this, let us know how it worked out for you. Be sure to send us pictures of your project and we will be sure to post it on our "
How Not To Do It Page"! No, Really!
Again we are proud to constantly give you new and exciting products for your fireplace and fire pit projects.
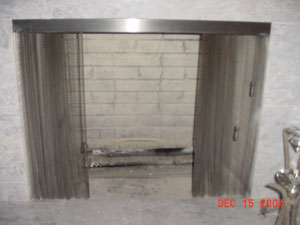
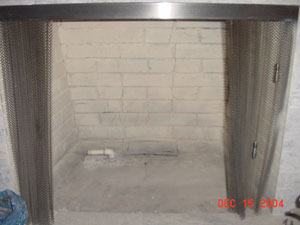
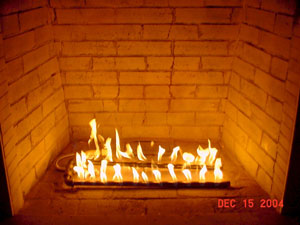
The fireplace below is in Pasadena, California. Ursula did a nice job, (2004!) but just recently she had us update it withe Sterling Silver walls.
The next 5 pictures are from Ursula in Pasadena. She just recently had us update her fireplace with a Sterling Silver interior. Nice touch!
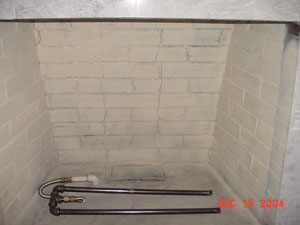
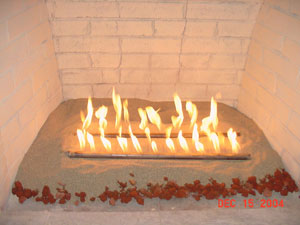
The only mistake that was made is that the glass should of been higher to cover the gas line coming in on the right side. He should of added more of a sand base, brought the sand and glass out of the fireplace for a more refined look. That is unless you like pipes!
This next fireplace was installed by
Sueun. She installed the Sterling Silver back panels and then placed a layer of
sand. Then she installed
Starfire Base Glass over the sand.
Sueun could not decide on which color, she she added almost all!!!!! She added;
Drops,
Rounds,
Diamonds,
Toppings,
Toppers, If she wanted color, then she got it. I think it turned out very colorful.
We just finished a few more and we will post pictures as soon as we can.
__________________________________________________________________________________
Jeff Jampol
See who he is! and more importantly what he does, Impressive!
http://www.CelebrityAccess.com/members/profile.html?id=618
See Jeff's Website: http://WeManageLegends.com/Jeff-Jampol/
Anyway, lets start with what we did for Jeff.
He allowed and trusted us to create four great features in his home in Hollywood:
Click on the links or pictures to see the complete all of the pictures
Outdoor Fireplace

Sterling Silver panels, Gray Base Glass, Gray Reflective Base Glass were used.
Living Room Fireplace

Sterling Silver panels, Gray Base Glass, Gray Reflective Base Glass Aluminum Surround (flat version) were used.
Office Fireplace

Sterling Silver panels, Bronze Rust Copper Base Glass, Aluminum Surround (flat version) were used.
Bedroom Fireplace

Starfire Base Glass, Aluminum Surround, Direct Vent Conversion, Sterling Silver Panels, this is the first one we installed with Black Panels!
_____________________________________________________________________
Direct Vent Conversions! (Direct Vent page)
Yes these can and able to be converted!
How to make "THIS"
(Click below to see how we did this!)

Into "THIS"

__________________________________________________________________________________
Larry Kraines Fireplace Surround

Simon and Roberta Hollis Fireplace Surround
Click "HERE" or on the picture to see the complete installation!

______________________________________________________________________
Jasmine Bals Modern Free Form Surround with Sterling Silver Panels and FireBalls!

The picture below is of the completed
Fireplace Surround, Direct Vent Conversion,
FireGlass installation and the
FireBalls Looks great!
Click "HERE" or on the picture below to see how this was made and installed.

__________________________________________________________________________
Click HERE or on the picture below to see how this was assembled!
Black Magic, Sterling Silver Panels and Surround

________________________________________________________________________
To see how this fireplace was transformed CLICK HERE or on the pictures below!

TO

Creativity and IMAGINATION is how.

________________________________________________________
Sterling Silver Panels
http://www.Moderustic.com/Sterling-Silver-Fireplaces.html
and
http://www.Moderustic.com/Mike-and-Megan-Boling-Fireplace.html
several movies on this page at the bottom.
and
http://www.Moderustic.com/Sterling-Silver-Panels.html
The panels come in 6 colors/ shades, Bronze, Gray, Black and each in reflective with chromium or sterling silver.
In most average fireplaces the panels are $125.00 each (up to 3 square feet) if a notch is required to clearance the gas line, add $55.00. Typical fireplace if you are doing all 3 panels is $500.00 or just the rear panel = $125.00
See Movies here:
http://www.Moderustic.com/Movies-Movies-Movies.html
Page 2 of Sterling Silver Fireplace Panels!
Other Custom Projects of Interest

Currently under-development, our latest product "tubED" is
a fire feature that uses sound waves to electronically excite
gas molecules. Check out the Video Here.
Dallas Fire & Water Fountain (click here)
Dave's Little Fire Table (click here)
Fireplace Surrounds (click here)
Dave Sutton Table (click here)
Fire Tables and Portable Fire Pits (click here)
Dominick's Fire & Water Fountain (click here)
____________________________________________________________________________________
From here:
From nasty to BEAUTIFUL in an hour!

To here:

_________________________________________________________________________
Click HERE or on the picture below to see how this was installed!

And what was used
_________________________________________________________________________
Click below or on the picture below to see step by step makeover